I’ve been using AI tools to generate professional headshots for my social media profiles, but they keep turning out slightly off—uncanny eyes, weird lighting, and skin that looks too smooth or plastic. I’m worried people can tell they’re fake and that it might hurt my credibility. Can anyone share practical tips, prompts, or editing tricks to make AI headshots look more natural and believable for LinkedIn and other platforms?
The first thing I learned messing with AI headshots is that the generator matters more than people think. Some apps turn you into a wax statue. Eyes look too sharp, skin looks like plastic, jawline suddenly from Marvel.
You want something that keeps your own face, with all the small flaws and texture, not a random “beautified” version of some template face.
I’ve had decent results with this one on iPhone:
They lean more toward “this looks like an actual photo of a person” instead of “this looks like a filter ad”. It runs on the phone, no extra account junk, which I liked.
- Start with normal, clear photos
This part is boring, but it decides everything.
What I do:
- I use 1 to 3 selfies that are sharp and not grainy.
- I take them in daylight near a window, not under orange kitchen light.
- I keep my face neutral or with a small smile, no duck face, no crazy angles from below.
- I skip heavily edited photos, portrait mode blur, skin-smoothing filters, and Snapchat style stuff.
Every time I fed one of these tools a filtered selfie, the result looked off. Wrong skin tone, weird cheeks, eyes too big. When I used a plain phone selfie with decent light, the output looked much closer to me.
- Pick a preset that fits where you will use the photo
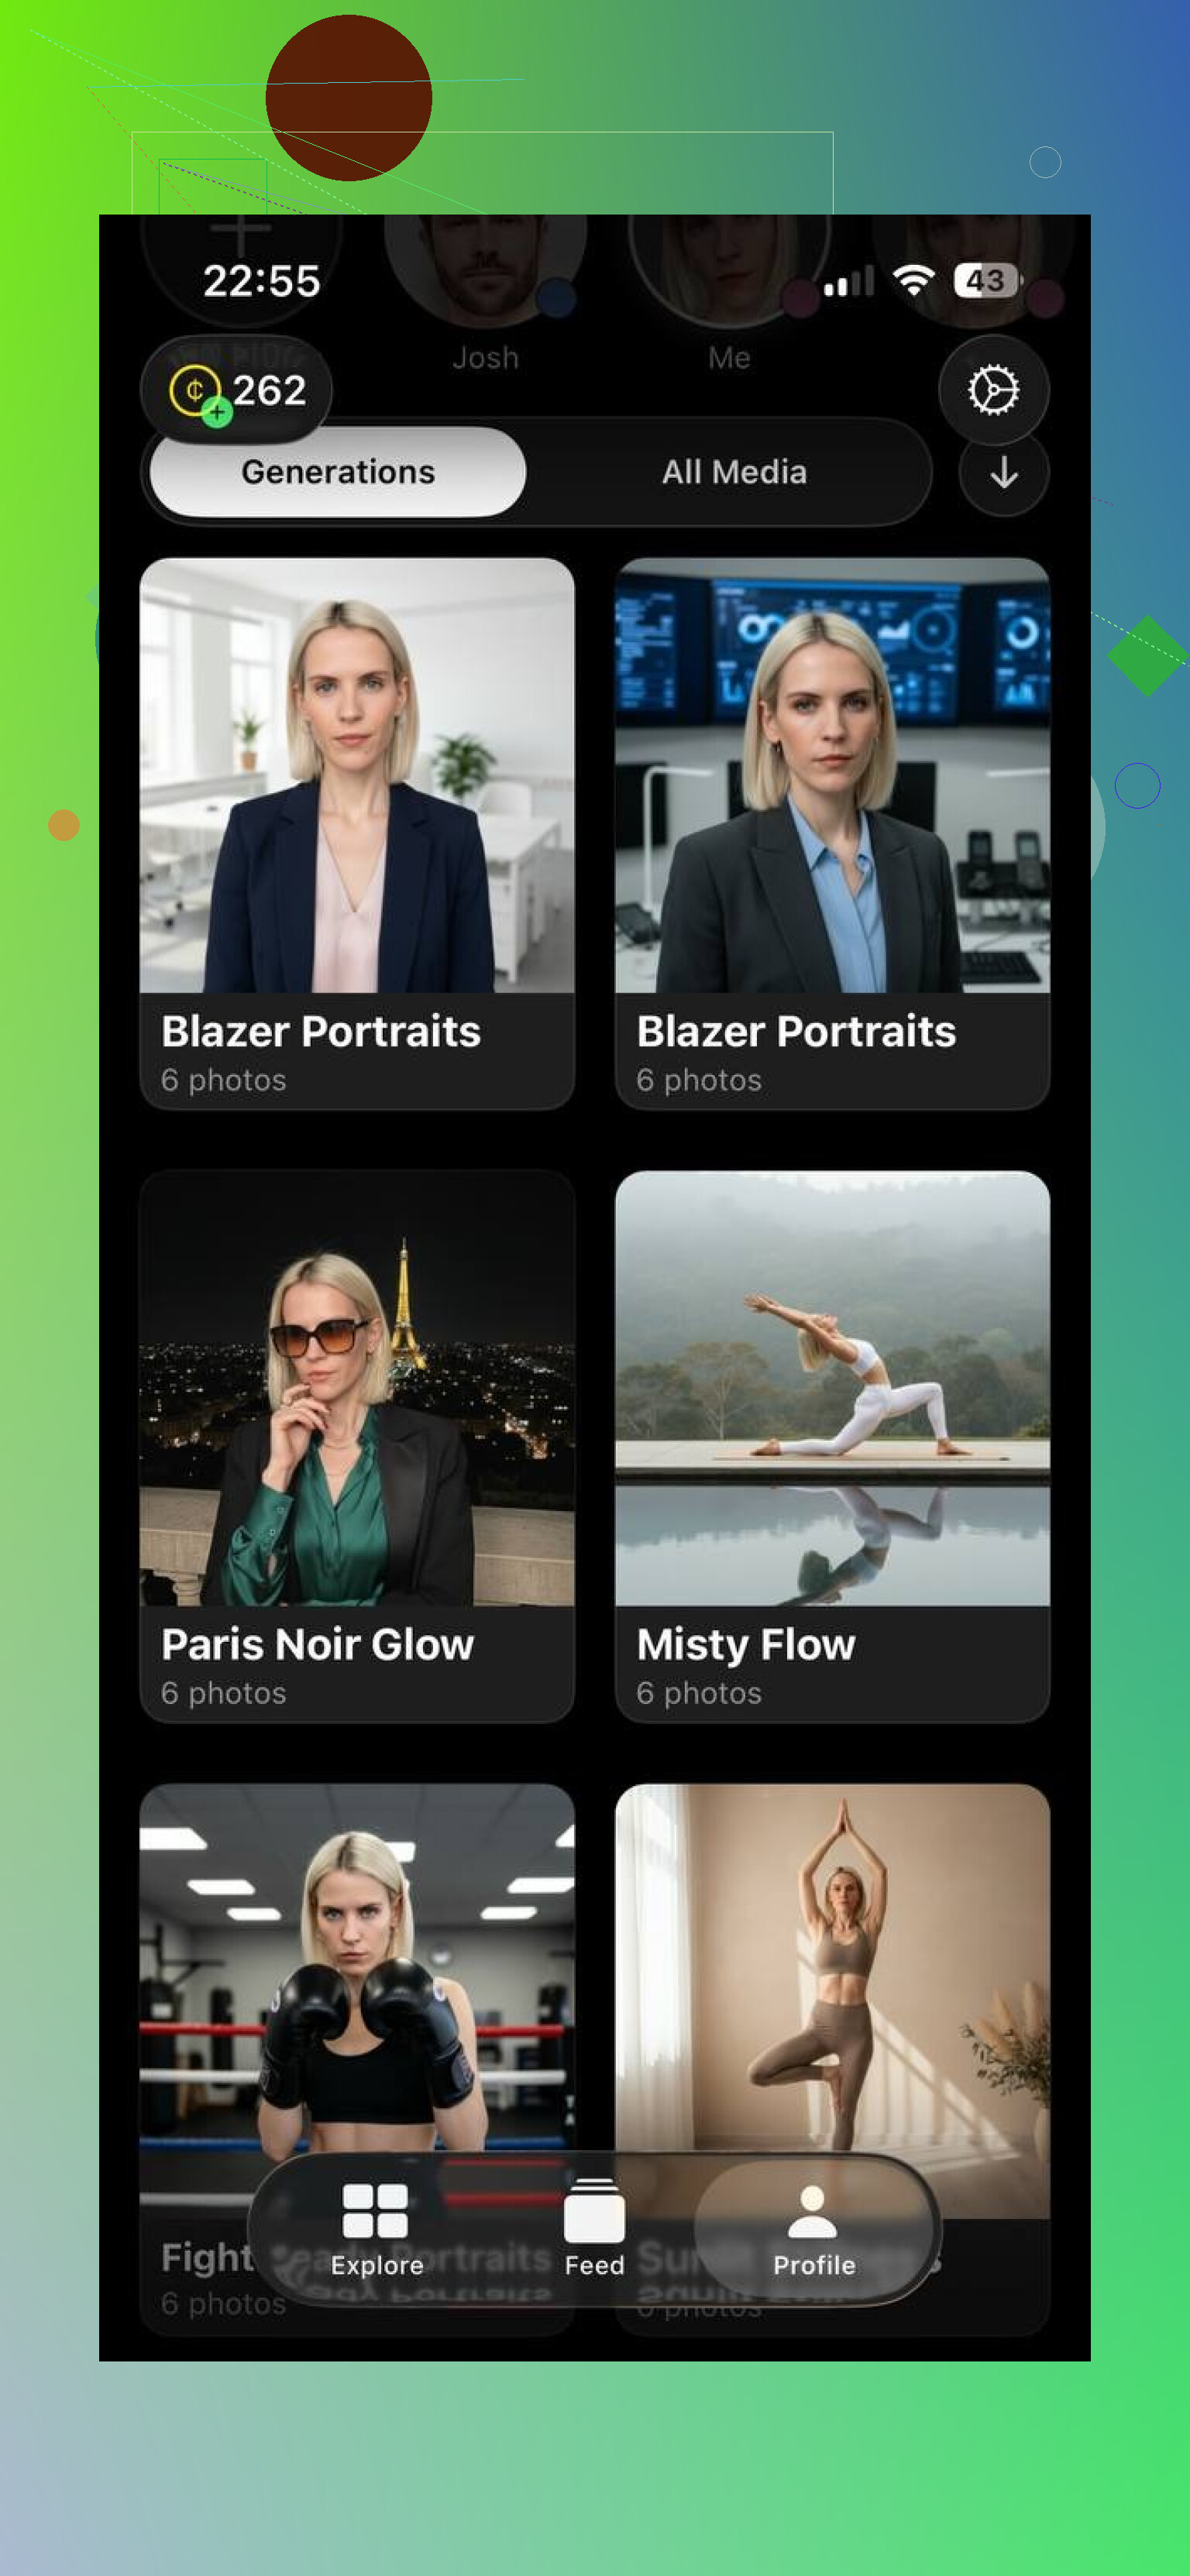
This is where people mess up. They pick some “model” or “cinematic” style, then wonder why the headshot looks fake on LinkedIn.
Here is how I choose now:
-
For work stuff, LinkedIn, company site:
- I pick a professional or corporate preset.
- Neutral clothes, blazer or simple shirt.
- Neutral background, soft studio or office-style.
-
For Instagram, Facebook, casual profiles:
- I pick a lifestyle preset.
- More relaxed clothes, maybe outdoors or light indoor setting.
- Less formal posing.
-
For travel or fun profiles:
- I pick travel or creative presets.
- City, nature, or cafe type backgrounds.
The presets in Eltima AI Headshot Generator try to keep your real appearance while just changing the setting and vibe. When I stayed close to my actual style, the images felt believable. When I tried “model in a luxury office” while I usually dress in hoodies, it looked like a stock photo with my face stamped on.
- Watch your facial features
If the face looks off, people notice in 1 second.
What I now double-check in every AI headshot:
-
Eyes:
- They should point the same direction.
- No double pupils.
- No weird reflections that do not match the light.
-
Mouth and teeth:
- Smile should match how you normally smile.
- Teeth should not look like a default “perfect teeth” render if your teeth are not like that.
-
Hair:
- Hairline should be close to your real one.
- Hair texture should roughly match reality, especially curls or waves.
-
Face shape:
- Eltima tends to keep my bone structure close to my selfies, which helps.
- If the app randomly slims your face a lot or sharpens the jaw, it starts to look like a character preset.
When the generator over-smooths the skin or changes the nose or jaw too much, people feel something is off even if they cannot explain what. I reject those and re-run with better source photos.
- Background and lighting matter more than filters

Two photos with the same face can feel real or fake depending on background and light.
What works for me for realism:
-
Background:
- For professional use, I pick simple, blurred, or studio-like backgrounds.
- No busy streets, no extreme colors, no chaotic rooms behind me.
- Plain walls, soft office, or abstract blur look more like real headshots.
-
Lighting:
- The direction of the light on your face should match shadows in the background.
- If your face is lit from the left, but the room behind you is lit from the right, the brain flags it as wrong.
- I avoid harsh rim light or dramatic colored light for professional photos.
-
Angles:
- Slight angle is fine.
- Extreme high or low angles tend to look stylized, not like a normal headshot you would send to HR.
When something feels “3D render” instead of “photo of a person holding still”, it is usually due to lighting and background, not only the face.
- Keep editing light and consistent
Once I get an AI headshot I like, I do small fixes only.
What I usually do:
- Adjust brightness and contrast a bit so it matches my other photos.
- Maybe a small white balance tweak if it is too warm or too cold.
- I avoid skin-smoothing filters, face reshaping, or heavy color filters.
I also try to keep my profile pictures on different platforms somewhat consistent. If my LinkedIn headshot looks 10 years younger than my Zoom camera, that creates weird expectations when I meet people.
- Test the photo before using it everywhere
Before I put a new AI headshot on LinkedIn or a dating app, I run through a quick checklist:
-
I open the AI photo and a real recent selfie side by side.
- Do they look like the same person on the same week of life.
- Is the hairstyle close to how I look now.
- Are age lines, freckles, or small marks still partly there, not fully erased.
-
I send the AI headshot to a friend without context.
- I ask “does this look like me or does something feel off”.
- If the first reply is “who is this” or “your eyes look weird”, I bin that version.
-
If something looks wrong, I change one thing at a time:
- Use different input selfies.
- Pick another preset closer to my real style.
- Reduce creative or dramatic backgrounds.
Usually one or two iterations are enough.
Bottom line from my runs with these tools
If you want AI headshots that do not scream “AI”, the stack that worked for me looks like this:
- Use a generator focused on realistic portraits, not filters. Eltima AI Headshot Generator is one option:
- Feed it 1 to 3 clear, natural selfies with good light and no heavy filters.
- Pick presets that match your real use case, not aspirational model shots.
- Check facial features, lighting, and background for anything off.
- Do minimal, practical post-editing.
- Compare against a real recent photo and ask at least one person for feedback.
Used like this, the results have been good enough for LinkedIn, Instagram, and even dating apps without people calling out anything fake. It still looks like me, only on a good day with a decent photographer.
9 Likes
You are right to be worried. People spot “AI face” faster than they admit.
A few things to add on top of what @mikeappsreviewer said, and I slightly disagree with them on one point.
- Dial down the model’s “beauty” bias
Most face models try to beautify by default. That is where the plastic skin and Marvel jaw come from.
What to do:
- Avoid presets with words like “glamour”, “beauty”, “cinematic”, “model”.
- If the tool has sliders for “enhancement”, “retouch”, “beautify”, set them near zero.
- If there is a “photorealistic” or “minimal edit” style, start there.
If your base generator does not let you reduce this, you will fight it forever.
- Use boring reference photos, not your “best” ones
Here I disagree a bit with the “1 to 3 selfies” point. For consistent realism, more variety helps.
If the app supports multiple reference images:
- Use 8 to 15 shots from different days.
- Include one slightly tired photo, one with minor blemishes, normal expressions.
- Avoid only-perfect selfies. The model then learns a fake, over-posed version of you.
This gives the model a more honest “average” of your face.
- Force realistic skin texture
The fastest giveaway is waxy skin.
Workflow that works for me:
- Generate with AI.
- Export at the highest resolution the app allows.
- Open in a simple editor like Snapseed, Lightroom Mobile, or even built-in Photos.
- Add a tiny bit of “grain” or “texture”.
- Reduce clarity or sharpness on the eyes slightly if they look too laser-sharp.
Ironically, adding micro-noise makes people read it as a real camera shot.
- Fix the eyes with a separate pass
If your generator keeps nailing everything except the eyes:
- Use AI only for pose, lighting, and general look.
- Take a real selfie with similar angle and light.
- In an editor, lightly blend your real eyes onto the AI image. Even a rough phone edit works if you zoom in and take your time.
- Or use a retouch tool only on the eyes to lower sharpness and saturation a bit.
Human eyes have small asymmetries and dullness. AI eyes look too bright and too aligned.
- Match camera limitations
Real phone sensors have flaws. AI often forgets that.
To make it feel like a phone photo:
- Slight chroma noise in shadows.
- Mild lens blur toward the corners.
- No ultra-crisp hair strand detail everywhere.
Some editors have “Phone” or “Portrait” profiles. Those work better than “HDR” or “Vivid”.
- Style match your usual posts
If your AI headshot looks like studio Vogue and all your other posts look like random kitchen selfies, people feel the gap.
Quick check:
- Open your last 9 posts on the platform.
- Place the AI headshot among them.
- Ask yourself: does it look like it came from the same phone and same person on the same year.
If not, adjust color temperature, contrast, and crop until it blends.
- Use it as a base, not as the final image
You do not need 100 percent AI.
One workflow that feels more honest:
- Use AI to find pose, wardrobe idea, and background style.
- Then recreate that look with a real photo, even with a friend and a phone.
- Retouch that real image very lightly.
You get the benefit of AI “art direction” without the uncanny valley.
- Be transparent in high stakes spaces
For LinkedIn or places where people meet you in person:
- Pick an AI headshot that is close to how you look on a normal day.
- Keep your age lines, moles, scars. Do not erase all of them.
- If someone asks, say “I used an AI-assisted headshot tool, but it is based on current photos.”
That removes the “are they trying to hide something” vibe.
If you do all this and your results still look off, the issue is probably the specific generator, not your inputs. Try one that lets you control retouch level and texture more, instead of one focused on “glam” or viral looks.
The short version: your issue is less “which app” and more “where the line is between ‘polished’ and ‘this person is from the uncanny valley.’”
A few things I haven’t seen @mikeappsreviewer or @jeff hit directly:
- Match how people actually see you
If your coworkers only ever see you on a 720p Zoom cam, a razor‑sharp, studio‑lit AI portrait will look fake even if it is technically perfect.
What to adjust:
- Slightly soften the whole image so it feels like normal webcam / phone quality.
- Skip ultra-shallow fake bokeh if no one ever sees you shot on a DSLR.
- Keep clothes and hair exactly how you’d show up on a real call. If you never wear a blazer, your “CEO headshot” screams stock photo.
- Keep one signature imperfection
This is the trick that makes people stop overthinking the image:
- Leave a real mole, scar, asymmetrical eyebrow, slightly crooked tooth, or faint under‑eye line.
- If the AI wipes everything, re‑add one in an editor, even just subtly.
Our brains file “perfect” faces under “ad” or “game character.”
- Don’t center the face like a passport photo
A lot of AI tools default to dead-center, stare-at-the-camera framing, which looks fake fast.
Try:
- A tiny bit of head tilt.
- Cropping off center so there is a little more space on one side.
- Letting some hair fall imperfectly instead of the “helmet” look.
- Make the background boring but not generic
Here I disagree a bit with the super-clean studio craze. Perfect gray gradient walls look like template outputs.
Better:
- Something plausible for your life: a softly blurred bookcase, a plant, a neutral room corner.
- Avoid obviously AI patterns (melting books, ghost keyboards, impossible windows). If anything in the back looks weird, crop tighter.
- Use compression in your favor
Social media compresses images anyway, so you can use that to hide AI weirdness:
- Export at a reasonable size, not 8K.
- Upload and then zoom the final platform version. If the eyes still look too “laser,” re-edit and tone down clarity / contrast just on the eyes.
At normal feed size, people do not inspect pixels, they just feel “believable or not” in 0.5s.
- Don’t chase the “perfect” version of you
If each new generation looks more like your aspirational self, you’re going the wrong direction.
Quick check:
- If you’d be nervous walking into a real meeting looking like that picture, it’s too far.
- The right headshot should feel like you on a very good hair day, not you after 3 years in a Marvel CGI studio.
- Decide your honesty level and stick to it
You’re already worried people will clock it as fake, which is your gut telling you something:
- For LinkedIn / dating, err on the side of “this really looks like how I appear this year.”
- For Instagram, you can get away with a bit more polish, but keep the same face across all platforms. Wildly different looks = instant suspicion.
If you tweak realism at the context level (how people actually see you, platform compression, your usual style) instead of just fighting eyes/skin in the app, you’ll usually cross that line from “AI doll” to “ok, that’s just a nice photo of them.”