If you’re here, you’ve probably lost some precious data and are frantically searching for answers. Don’t worry; Disk Drill has got your back. Let’s break down how this software works, step by step, with honest commentary and helpful insights. ![]()
Why Disk Drill? 
Before we dive into the process, let’s talk about why Disk Drill is a standout.
- It supports hundreds of file types, including RAW images and videos for professionals.
- Offers RAID recovery (great for advanced setups).
- Comes with a free version to recover up to 500MB of data, so you can try it risk-free.
- Built by CleverFiles, a trusted US-based company with a strong reputation.
Okay, enough preamble—let’s get into the meat of it.
Step 1: Installation 
Disk Drill is a freemium software, meaning you can start for free but will need to pay for advanced features. You can recover up to 500MB of data without spending a dime, which is perfect if you’ve only lost a few files. To go beyond that, you’ll need to upgrade to the Pro or Enterprise version.
Installation Process
![]() Download the software from the official Disk Drill website.
Download the software from the official Disk Drill website.
![]() Launch the installer and follow the on-screen wizard.
Launch the installer and follow the on-screen wizard.
![]() Once installed, open Disk Drill and select the drive or device you want to scan.
Once installed, open Disk Drill and select the drive or device you want to scan.
![]() Pro Tip: You don’t need to uninstall the free version to upgrade. Simply purchase a license, activate it, and keep going.
Pro Tip: You don’t need to uninstall the free version to upgrade. Simply purchase a license, activate it, and keep going.
![]() Time needed: Less than 5 minutes.
Time needed: Less than 5 minutes.
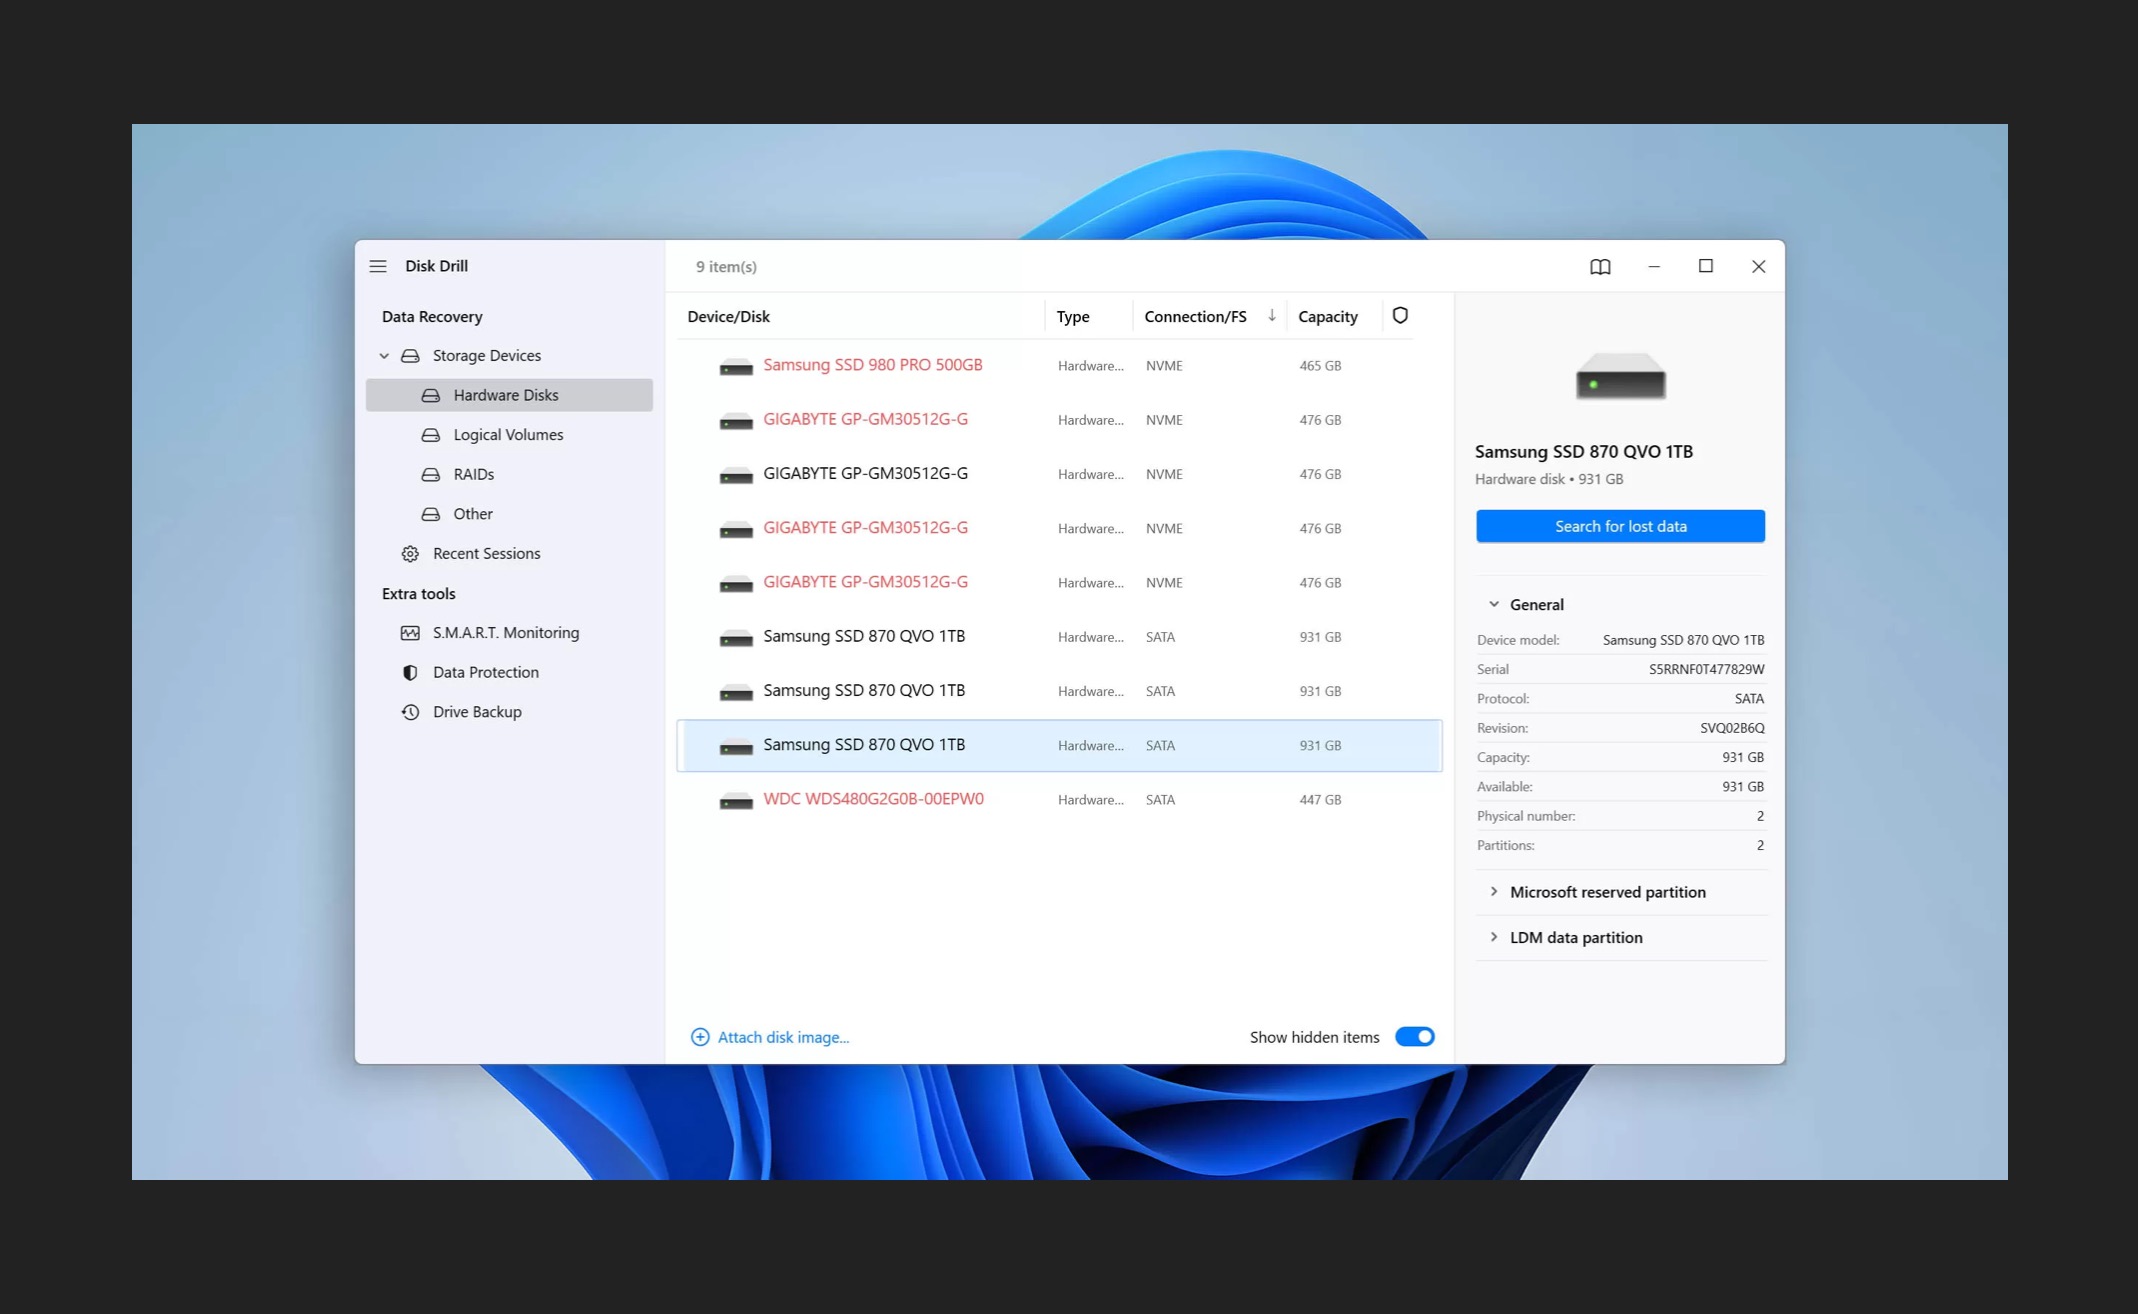
Step 2: Choosing a Source Device 
This is where the fun begins. Once you launch Disk Drill, you’ll see a list of all connected storage devices.
What You’ll See:
- Hardware Disks (e.g., your internal hard drive).
- Logical Volumes (partitions within a drive).
- RAID Arrays (yes, it can recover data from RAID setups).
- Other Devices like USB drives or SD cards.
![]() Disk Drill goes the extra mile with details. Clicking on a device shows additional information like model number, serial number, and even its health status. A warning icon (“!”) indicates that something might be wrong with the device, and you can click it for more details.
Disk Drill goes the extra mile with details. Clicking on a device shows additional information like model number, serial number, and even its health status. A warning icon (“!”) indicates that something might be wrong with the device, and you can click it for more details.
How to Start a Scan:
![]() Click on your target drive.
Click on your target drive.
![]() Hit the Search for lost data button.
Hit the Search for lost data button.
![]() Disk Drill automatically selects the best recovery method for the job (Quick Scan, Deep Scan, etc.).
Disk Drill automatically selects the best recovery method for the job (Quick Scan, Deep Scan, etc.).
![]() Pro Tip: Disk Drill remembers your progress. If you’ve scanned a drive before, you can reload the session and pick up where you left off without wasting time.
Pro Tip: Disk Drill remembers your progress. If you’ve scanned a drive before, you can reload the session and pick up where you left off without wasting time.
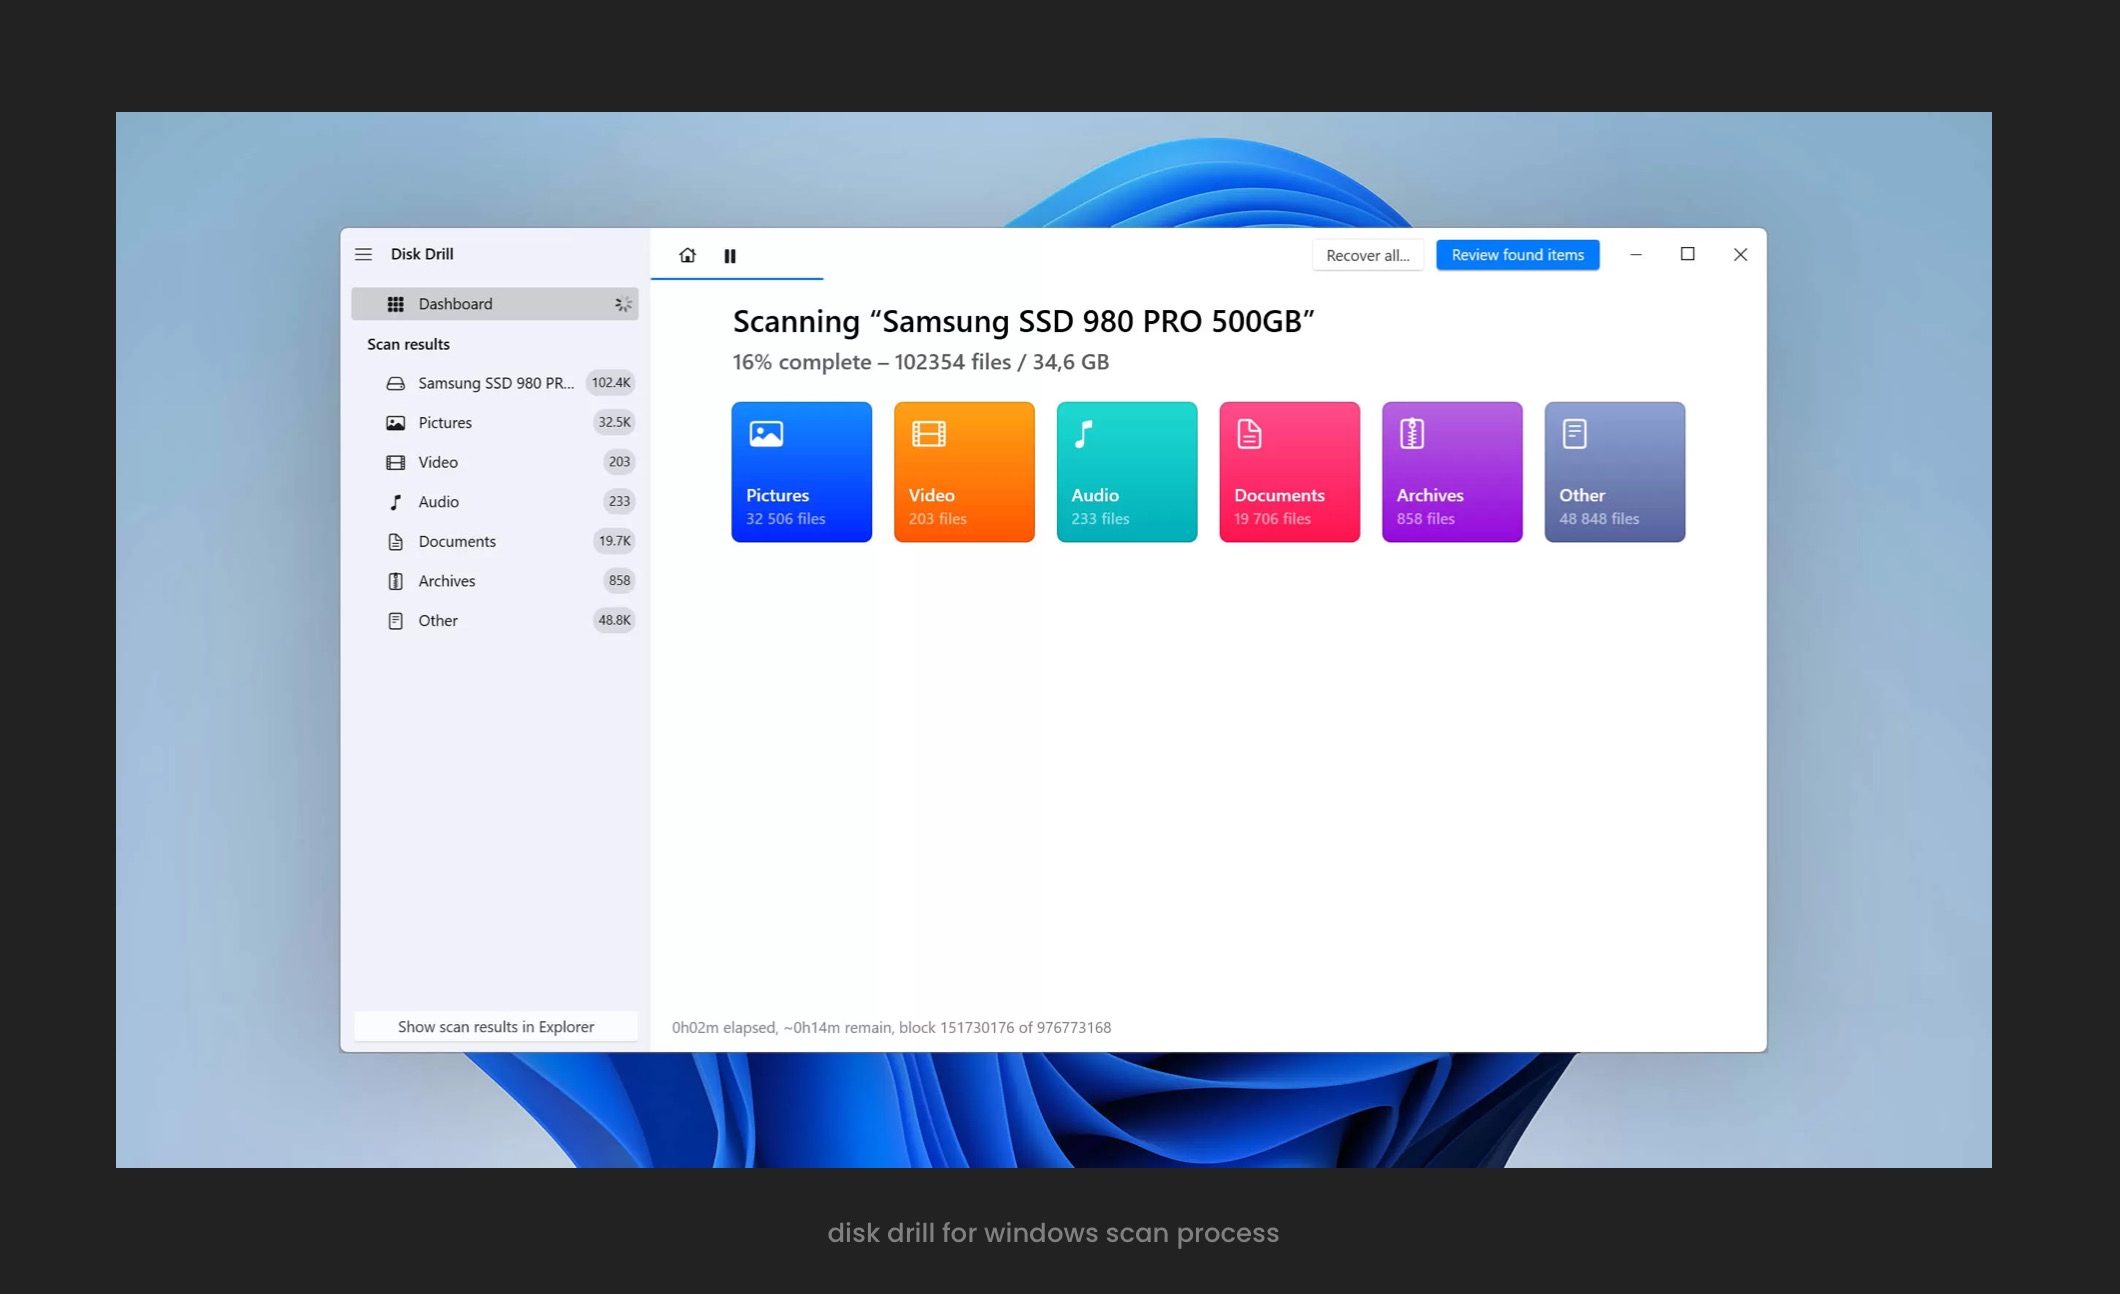
Step 3: The Scanning Process 
Disk Drill’s scanning engine is powerful yet intuitive. During the scan, it categorizes found files into:
 Pictures
 Videos
 Audio
Audio Documents
 Archives
 Other
Other
What Stands Out?
- Speed: Disk Drill is impressively fast, even when scanning large drives.
- Mid-Scan Recovery: Can’t wait for the full scan? You can recover files as they appear—great for urgent situations.
![]() User Note: “I used Disk Drill to recover videos from a corrupted SD card. It found files in the first few minutes that other tools didn’t even detect!”
User Note: “I used Disk Drill to recover videos from a corrupted SD card. It found files in the first few minutes that other tools didn’t even detect!”
Step 4: Managing Scan Results 
Now comes the moment of truth—reviewing the files Disk Drill found.
File Organization
Disk Drill neatly organizes recoverable files into three categories:
![]() Deleted or Lost: Files with their original names and folder structures.
Deleted or Lost: Files with their original names and folder structures.
![]() Reconstructed: Files recovered by signature (no folder structure).
Reconstructed: Files recovered by signature (no folder structure).
![]() Existing: Files already present on the device.
Existing: Files already present on the device.
Preview & Filters
- Preview files before recovery to ensure they’re intact.
- Use filters to narrow results by file type, size, or date.
- Switch between list view (more details) and thumbnail view (visual previews).
![]() Pro Tip: Check recovery chances next to each file—Disk Drill rates them as high, moderate, or low.
Pro Tip: Check recovery chances next to each file—Disk Drill rates them as high, moderate, or low.
Step 5: Recovery and Post-Processing 
Once you’ve identified the files you need:
![]() Add them to the recovery queue.
Add them to the recovery queue.
![]() Click Recover and choose a safe recovery destination (not the same drive to avoid overwriting data!).
Click Recover and choose a safe recovery destination (not the same drive to avoid overwriting data!).
![]() Wait for Disk Drill to do its thing—it even shows a progress summary.
Wait for Disk Drill to do its thing—it even shows a progress summary.
![]() Success! After recovery, Disk Drill offers a button to open the recovered files in File Explorer, making it easy to verify everything worked.
Success! After recovery, Disk Drill offers a button to open the recovered files in File Explorer, making it easy to verify everything worked.
Is Disk Drill Safe? 
100% YES. Here’s the breakdown:
 No Malware: Disk Drill is clean and secure.
- Privacy First: No third-party data sharing, and you can opt out of analytics.
- Non-Destructive: Scans are read-only, so your original data remains untouched.
![]() Did You Know? Disk Drill is developed by CleverFiles, a US-based company with a stellar reputation. They’re privacy-forward and regularly update the software to stay compatible with the latest Windows versions.
Did You Know? Disk Drill is developed by CleverFiles, a US-based company with a stellar reputation. They’re privacy-forward and regularly update the software to stay compatible with the latest Windows versions.
Performance Highlights 
Disk Drill doesn’t just look good—it performs.
Key Features:
- Supports hundreds of file types, including RAW formats for photographers and videographers.
- Recovers data from encrypted drives (as long as you have the password).
- Handles lost partitions and RAID setups like a pro.
Who Benefits Most?
![]() Photographers: Disk Drill excels at RAW image recovery.
Photographers: Disk Drill excels at RAW image recovery.
![]() Videographers: Recovers professional video formats like Apple ProRes.
Videographers: Recovers professional video formats like Apple ProRes.
![]() Professionals: Great for lost documents, presentations, and more.
Professionals: Great for lost documents, presentations, and more.
Pricing: Is It Worth It? 
![]() Free Version: Recover up to 500MB of data.
Free Version: Recover up to 500MB of data.
![]() Paid Plans: Choose between Pro (personal use) or Enterprise (business use).
Paid Plans: Choose between Pro (personal use) or Enterprise (business use).
What You Get with Pro:
- Unlimited recovery.
- Lifetime upgrades (optional).
- Access to advanced features like RAID recovery.
![]() Pro Tip: The free version is a great way to test the waters. If you’re happy with the results, upgrading is a no-brainer.
Pro Tip: The free version is a great way to test the waters. If you’re happy with the results, upgrading is a no-brainer.
Limitations to Keep in Mind 
Disk Drill is powerful, but it’s not perfect:
- No support for iOS or Android recovery on Windows.
- Some advanced features (like manual RAID reconstruction) are still in development.
- Limited extras like disk cleanup or duplicate file finder.
Final Verdict: Why Choose Disk Drill?
![]() Ease of Use: Even beginners can navigate it like pros.
Ease of Use: Even beginners can navigate it like pros.
![]() Performance: Finds files others can’t.
Performance: Finds files others can’t.
![]() Value: A solid free version plus affordable paid plans.
Value: A solid free version plus affordable paid plans.
If you’re serious about data recovery, Disk Drill is a top contender. Its robust features, clean interface, and excellent performance make it a go-to solution for both personal and professional use.